Unreal Engine 4.7 is our biggest release yet, with the power to render huge numbers of instanced objects in large worlds, beautiful rendering of leaves and foliage, HDR texture support, in-editor animation editing, along with hundreds of optimizations and improvements.
Many highly-requested features have been added: You can now assemble new actors using components right in your level, and even create your own custom component types using Blueprint visual scripting or C++! Speaking of scripting, the Blueprint Editor UI has been redesigned with a clean, unified layout. And it’s never been easier to import content in your project -- Unreal Editor now detects new asset files and imports them automatically!
HTML5 platform + WebGL is ready to use -- run your game in a compatible browser with a single click! You can also now build, cook and deploy Android devices on Mac. For virtual reality creators, new “VR Preview” feature immerses you in your world instantly from the editor. In addition, you can now access Leap Motion support if you’re building a code-based project. Finally, we now give you the full C++ engine source code in every release to make learning and debugging even easier!
This release includes 38 great changes that were submitted from Unreal Engine’s amazing community of developers. Epic would like to especially thank community member Sébastien Rombauts for contributing his Git source control plugin to Unreal Engine for this release. Amazing work! Thanks to all of the contributors below:
Artem V. Navrotskiy (bozaro), ArneBezuijen, Black Phoenix (PheonixBlack), codetackler, Daniel Zeligman (dzeligman), Derek van Vliet (derekvanvliet), Fazouane Marouane (fazouane-marouane), Jesus Fernandez (jsfdez), Lukasz Baran (iniside), Moritz Wundke (moritz-wundke), Michael Kösel (TheCodez), Michael Allar (Allar), Marat Radchenko (slonopotamus), Pedja Lubomirovic (3dluvr), Pierdek, Quadtree, Rama (EverNewJoy), Robert Wallis (robert-wallis), Rick Yorgason (Skrapion), Simon Taylor (simontaylor81), Stephen Whittle (stephenwhittle), Tobias Mollstam (mollstam), yaakuro
Major New Features
Realistic Foliage Lighting
The new Foliage Shading Model allows light to be transmitted through grass, leaves, paper, and other materials

Diffuse lighting on the opposite side of the surface becomes transmissive lighting on the side being shaded
- Transmissive lighting is a mix of wrap-around diffuse with a view dependent lobe for backscattering
- Subsurface color filters this lighting and can be used to represent varying thickness as well (e.g. leaf veins)
- Note that using opacity with this shading model will only affect shadow falloff distance
Foliage Rendering for Large Worlds
The foliage system has been optimized to to support huge, open environments!

We now use a hierarchical system for managing and culling of foliage that scales to millions of instances! Also, we now smoothly transition between mesh LODs with a temporal fade to eliminate the annoying pop when switching LODs!
In-World Component Editing
Components can now be added directly to actors placed in your level. This allows you to assemble new actors out of components without having to create a Class Blueprint first. It’s great for experimenting with components and assembling new objects right inside your level.

You can now select individual components in the 3D level, move them around using familiar gizmos and edit their properties.

After you create something awesome, click “Blueprint / Add Script” to save it as a reusable class or add scripting to it. This will automatically replace your actor with an instance of that class.

Placeable Empty Actors
You can now drag and drop to place “empty actors” right into your level!

Empty pawns and characters are supported too. You can use the new in-world component editing features to build up interesting actors right in your level.
Blueprintable Components
Create your own component types using Blueprint scripting! You can save these components and reuse them on any actor!
Click “Add Component”, then select “New Blueprint Script Component…” right at the top. You can do this on actors in your level, from inside any Actor Class Blueprint, and even from the Content Browser’s “New Blueprint…” window.

Choose a Parent Class for your new component. “Scene Components” have a 3D position within the actor, but “Actor Components” only have scripting logic.

Here is the fun part -- writing Blueprint script code for your new component. In this example, we rotate the component’s owner (the actor) around the yaw axis every single frame using the Tick event. We named this component “Spinner” because it spins actors around!

Now, you can drop the component onto any actor in your scene and they will start rotating when the game begins. Yay, reusable modular functionality!

You can also drop it into any normal actor class Blueprint. Your new components can always be found in the “Add Component” menu (under the “Custom” category), and also in the Content Browser like any other asset.
Automatic Asset Importing
Importing meshes, sounds and textures has never been easier. Simply save your source art files under your project’s Content folder, and the editor will automatically import the new files, ready to be used in UE4!

If you update these files from an external application, the editor will detect that and automatically reimport your content! This makes iterating on game content much faster.
This feature is turned on by default, but you can toggle it using the “Monitor Content Directories” in the “Loading & Saving” section of editor preferences.
Redesigned Blueprint Editor UI
The Blueprint Editor has been redesigned to be easier to use! All three modes have been unified into a single screen to help streamline your workflow, along with many other improvements.

You can now freely rearrange panels, such as the Viewport and Graph views, and even have both on screen at the same time!
The "My Blueprint" view has been revamped to be cleaner and sparser, and it’s easier to add new functions and variables.
Selecting your actor’s name in the Components panel will show your class’ defaults (or you can click "Class Defaults" on the toolbar.) To see your Blueprint’s settings, use the "Class Settings" button on the toolbar (previously, this was called “Blueprint Props”)
HTML5 and WebGL Support (Windows Only)
You can now package and run your game in a Web browser through the binary tools you get through the Launcher.

Simply install the Emscripten SDK, restart the editor and launcher, then use the Launch drop down to select a web browser!

Notes about HTML5 support:
- Firefox, Safari, or 64-bit Chrome is required during development (shipping builds work fine in 32-bit Chrome)
- Windows is currently required for HTML5 support. We’re working on Mac for an upcoming release.
- Your game may take a while to prepare for HTML5, especially the first time, as assets and code in your project are optimized for the web browser.
OpenEXR: High Dynamic Range Textures
2D High Dynamic Range (HDR) textures can now be imported from OpenEXR files! You can store images with up to 16-bits of data per channel (about 30 stops of exposure.)

(Previously, only Cube Map textures were able to be imported from OpenEXR files.)
Android Development on Mac
The OS X version of Unreal Engine now fully supports Android development!

Mac users can now build, cook and package for Android, as well as deploy to Android devices from the editor or command-line.

- You will need Java for OS X and the Android SDK (which can be installed using the TADP installer in Engine/Extras/Android).
- After installing, either restart the editor, or set paths to the SDK in the new Android SDK section in Project Settings.
Full Engine C++ Source Code and Debug Symbols
Unreal Engine now includes the full engine C++ source code and debugging symbols when installed using the Launcher!

This allows you to seamlessly step into engine code while debugging, and you will have complete call stacks after a crash. You no longer need to compile the engine yourself to get full engine debugging powers.
Note that if you want to recompile the engine yourself, you’ll still need to go to GitHub to get all of the required files.
Play in Virtual Reality
We’ve added a new “VR Preview” button to the editor! If you have an Oculus Rift device plugged in, you can instantly play your game in virtual reality.

Clicking “VR Preview” will minimize the editor window, and pop up your game directly on the Oculus Rift device.
Leap Motion Plugin *Beta*
UE4 now ships with support for the Leap Motion device through a plugin. This allows you to use Leap’s hand tracking technology directly in your project. Their API is exposed in both Blueprints and code, so any project can take advantage of the tech.

For examples on how to use the plugin, please see Leap Motion’s website at https://www.leapmotion.com. Currently, this plugin is only available to those who build the engine from GitHub, and those who download the plugin directly from Leap’s website.
C++ Classes in Content Browser
Your game’s C++ classes are now visible in the Content Browser!

You can easily create new C++ classes right from the Content Browser! It will be automatically compiled and displayed in the editor, ready to use!

Double-click on C++ class icons to jump straight to the source code in Visual Studio or Xcode, or right click to create a new class using the selected class as a base.
Morph Target Exaggeration
Morph Targets can now be weighted higher than 100%, allowing for exaggerated poses, or below 0% for inverse poses.

Feature Packs and Content Packs
You can now add new “features” and content to your game at any time using Content Browser! Packs can contain any combination of content, blueprint classes or C++ classes.

All existing template project features are available as Feature Packs. So you could add a First Person Feature Pack to your game, and then later on add the Vehicle Feature Pack and be able to use both of these features in your project!
In Content Browser, just click Add New, then click “Add Feature or Content Pack…”. The files will be injected right into your project! Many packs may include built-in tutorials, too!

Even the Starter Content can be added to your project at any time. In fact, there is a new “Mobile Optimized” Starter Content pack you can choose, too.
Animation Editing System
You can now edit animations right inside the Persona animation tool!

Scrub the time slider, select, move and rotate bones using the gizmo and set keys at any frame. (Hint: ‘S’ key is a shortcut)

Inside Persona, all of your animation curve edits will be stored on an “additive layer”. If you decide to reimport your original animation, your modifications will be preserved! This layer only exists in Persona. Simply click the “Apply” toolbar button to commit your changes and see the animation in your game!

You can also save out a whole new custom animations! Use the “Create Asset” toolbar button to create animations from either a reference post, or your current pose or animation.

Some other notes:
- Animation curves can be disabled or deleted if you don’t need them curves
- Once baked, export will work with the final baked animation. Additive curves are not exported.
- When you retarget, the curves are not transferred. However, the final baked animation will be retargeted.
Instant Bone Controller Preview
Bone Controller nodes can now be adjusted interactively using the viewport gizmo, rather than having to recompile each time!

Currently this feature works with TwoBoneIK, ModifyBone & Fabrik nodes, but we will be adding more.
Creating Animations from Physics
You can now record physics simulation in the physics editor (PhAT) and save that as an animation!

Start by clicking "Record" on the toolbar, then interact with your object in the viewport to create an interesting simulation! After you're done, click "Stop" to save the simulation as an animation.
You can also capture animation right from your level!
- In the Level Editor, click the “Simulate” button in the Play toolbar drop-down
- Find the simulated Skeletal Mesh in your scene
- Right click on the mesh and select “Keep Simulated Changes” (or press the ‘K’ key) to save an animation!
Project Launcher
The new Project Launcher interface allows you to easily run or package your game with more control!
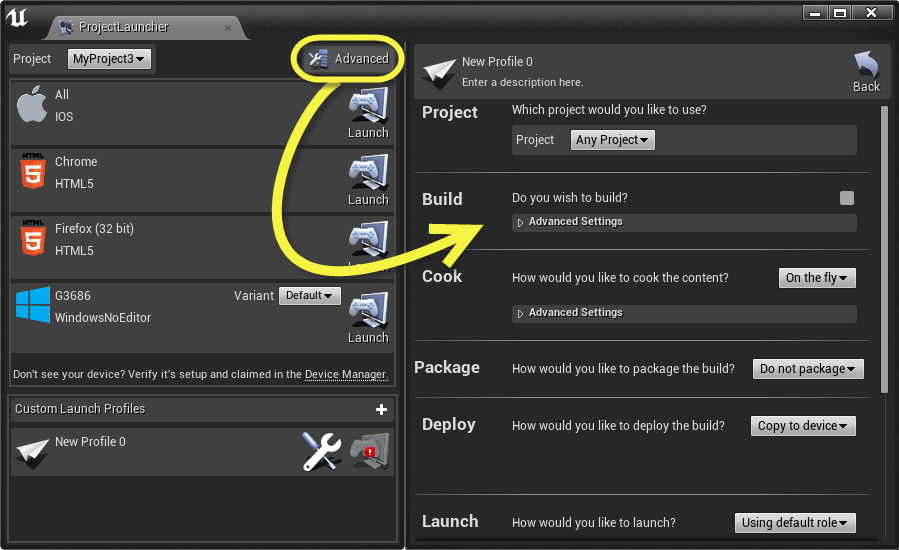
Project Launcher has features to help test your game on multiple types of devices and configurations, as well as running multiple sessions simultaneously. Launch your project on any connected device, with easily customizable build types and cooking preferences.
Use Custom Launch Profiles to create builds specific to your needs.
- All our advanced options are exposed.
- Select exactly the content you want to build.
- Build multiple platforms at once.
- Package and store builds for others to run, or to run later.
Of course, you can still run your game using the convenient “Launch” button on the main toolbar. But if you need more flexibility, just open up the the Project Launcher from either the “Launch” toolbar drop down menu, or the main Window menu.
Blueprint Merge Tool
You can now merge different Blueprints together using the new Blueprint Merge Tool.
This tool shows a visual comparison of two Blueprints and assists you in combining them! It’s great for merging versions of a single Blueprint that were modified by different team members.

There are three ways to use this tool:
- Click on File -> Merge in the Blueprint Editor
- Right click on an asset with a source control merge conflict and select Merge
- From the command-line, run: UE4Editor.exe -diff [options] <File A> <File B> <Common Base File> <Output File>
Git Source Control Plugin (Beta!)
Thanks to community member Sébastien Rombauts for graciously contributing his excellent Git source control plugin to Unreal Engine!!

If you connect your project to a Git repository, the editor supports most source control interactions such as adding and removing files, committing changes, displaying file history, diffing files, and displaying the source control status of any asset.
AI Perception System: Blueprint Scripting
The AI Perception System can now be configured using Blueprint scripts! Just add an AI Perception Component to your AI, then inspect and tweak its properties and events.

Tutorials for New Project Templates
Each New Project Template now has its very own Overview Tutorial that provides a brief outline of how each of that template’s assets and classes work.

Just click the ‘Play’ button on the Tutorial thumbnail in the Content Browser to start it!

Content Packs and Feature Packs can also have their own tutorials too! If you add a pack to your project, look for a tutorial that you can play that will teach you about that feature or content pack!
New Thumbnail Look and Feel
The editor now displays asset thumbnails using a new colorful style

Also, both C++ classes and Blueprint classes will now display a live 3D thumbnail when possible, as well as a small icon in the corner that indicates what the parent class is.
Paper2D: Improved Tile Map Layer Editing
We’ve added lots of useful layer editing features to the Tile Map editor!

- Layers can be reordered, moving them up or down with respect to each other
- Selection in the layer browser now controls which layer will be painted on rather than always painting on the topmost layer
- The selected layer is remembered across editing sessions
- The selected layer now has a helper grid rendered at the correct depth with a wireframe outline being drawn for all unselected layers
- Layer renaming now works exactly like renaming an actor in the World Outliner with a more obvious visual style and intuitive click interaction
- Layers can now be duplicated
- Tile maps can now be reusable assets or instances in the level, with a command to promote to an asset
- Newly added layers have more meaningful names
- Note: Tile maps are still an 'experimental' feature in this version of Unreal Engine
Paper2D: Flipbook Collision Detection
Flipbooks allow you to create 2D animations out of images that play in a sequence. Now, you can define collision properties for your animation frames!

Flipbook assets have a new Collision Source property that controls the source of collision data for the flipbook (if any)
- No Collision: The flipbook has no collision
- First Frame Collision: The flipbook has non-animated collision based on the first frame of the animation
- Each Frame Collision: The flipbook changes collision each frame based on the animation (Note: This setting can be expensive as it requires recreating the physics state every frame)
Some notes on usage:
- In many cases it may make more sense to attach collision components (e.g., a box component) to a socket on the flipbook component rather than directly generating collision from source frames, especially if you want some collision regions to overlap while others block
- Character movement still relies on the collision capsule, in most cases you want to use a different collision channel for the flipbook than BlockAll to prevent the capsule from getting stuck on the flipbook (move/be blocked based on the capsule, and test for overlap or collision with projectiles based on the flipbook)
UI: Custom Cursor Support
You can now create custom Widgets to use as Software Cursors in your project. You can use all the functionality of Unreal Motion Graphics to add text, health meters, tool-tips or whatever you desire to your cursor.

Software cursors can be useful in a number of cases:
- Adding cursors to platforms that do not have hardware cursors. For example, a virtual mouse cursor on a console.
- Adding cursors which are visually rich, have animations, or have complicated interactions.
- Adding cursors that look consistent across PC, Mac, Linux without having to worry about the platform specific formats.
You can use the new “User Interface” section of Project Settings to setup your game’s software cursor Widgets. If you do not specify a cursor, you will get a default hardware cursor.
Note: Software Cursor motion will be limited to your game’s frame rate, unlike a regular mouse cursor that is rendered by your operating system. This is the main tradeoff to consider.
Unreal Motion Graphics: New Widget Binding System
The binding system for widgets has had a massive overhaul to allow support for binding to sub-properties and functions on the widget, and to greatly improve performance!

Some notes about new Widget Bindings
- Bindings are based on a dynamically evaluated set of fields rather than using Blueprint scripting.
- Direct bindings to both C++ or Blueprint functions are supported!
- Trivial conversions are handled automatically (e.g. Linear Color to Slate Color, Texture2D to a Slate Brush.)
- Binding to properties have gotten much faster with this change! (about 10x speed improvement)
- Old bindings will continue to work, but you should update them to the new system to take advantage of the performance improvements
Visual Logger (AI Visualization Tool)
We have a whole new Visual Logger tool with lots features. This is designed to help you debug and fine-tune AI in your project!

- Log out events, then use powerful tools to search on a timeline. This video shows an example.
- Items on the timeline with warnings are now shown in yellow, and items with errors in red.
- You can use a special Debug Camera to fly around while the game is paused.
- Save out generated ‘reports’ from visual logger events. Hyperlinks in the reports allow you to filter the log, making it easier to analyze
Translucent Object Ordering Control
This new feature allows you to configure the order that the renderer draws translucent objects. This is really useful for 2D games!

In your project’s Rendering Settings, check out the new Translucent Sort Policy options
- Sort by Distance: Sort based on distance from the camera to the object’s bounding sphere center. This is the default and typically the best for 3D games.
- Sort by Projected Z: Sort based on the post-projection Z distance to the camera. This setting can cause popping as the camera rotates.
- Sort Along Axis: Sort based on the projection onto a fixed axis. This is typically the best option for 2D games. The axis to sort along is called Translucent Sort Axis and can also be edited in the renderer project settings (defaults to -Y)
Fixed Blueprint Cyclic Dependencies
Blueprint loading has been redesigned so that it should be able to handle any “cyclic” scenario you throw at it. Your Blueprints can intermingle and cross-communicate all they want, and most importantly: they will load up properly next time around.
This addresses many Blueprint on-load crashes, and other scenarios where Blueprints could be loaded in a malformed state!
Unreal C++ Programming Improvements
We’re continuously working to make C++ in Unreal Engine easier to use and more familiar to everyone.
- No special constructors needed! Your class constructors no longer need to take an Object Initializer argument.
- Creating sub-objects for Unreal classes now has a new simple syntax.
Multi-threaded Animation
Animation pose calculations are now offloaded to multiple CPU cores reducing the overall amount of time the engine takes to calculate animation.
This improves performance in games with many animated skeletal meshes!
Desktop-Quality Rendering on Android *BETA* (OpenGL ES 3.1 w/ AEP)
OpenGL ES 3.1 (combined with the Android Extension Pack) gives you the ability to use much of the full desktop rendering experience on Android devices! This feature is currently in beta testing, please provide feedback.
- “ES3.1+AEP” is now a selectable target in for building and cooking.
- Tegra K1 devices (for instance, the NVIDIA Shield Tablet) have been used for testing and development. More and more devices will be supporting AEP in the future!
- Enable it via the “Enable OpenGL ES31 + AEP” option Android Project Settings.
- Note: Currently, you’ll need to compile the engine yourself from the source on GitHub to use this feature.
- Note: Blueprint-only projects will need to recompile the base UE4Game executable with OpenGL ES 3.1 support by enabling bBuildForES31 in the engine’s BaseEngine.ini file.
Downloadable Content (DLC) Packaging *BETA*
Downloadable content (DLC) can now be packaged up for distribution!
Currently this feature is in beta testing and requires a command-line tool. Create your add-on DLC inside a game plugin Content folder, and use the new packaging tool to “cook” and optimize your content for your platform of choice.
This feature makes use of the game’s asset registry to know what content is already supplied in the shipped game, and will cook anything needed from the game’s content into the DLC.
To use this feature, run the cook utility for your main game with “-CreateReleaseVersion=x.y”, then again for each DLC plugin with “-BasedOnReleaseVersion=x.y -DLCName=MyPluginName”.
Android Movie Playback
Loading movies and startup movies now play on Android devices! You can configure startup movies to play in your Project’s Settings.
Android movies must be in MP4 format to play correctly. Also, the movie playback feature requires a device with Android 4.0 or above.
Android SDK Path Setup in Editor
You can now set the locations for the SDK components needed for Android development directly in the “Android SDK” section of Project Settings. This can greatly simplify the initial setup!

These settings override any environment variables that are set (you can leave them blank to use the environment variables if you prefer the original method)
Access Non-Editable Blueprint Variables
You can once again access variables from other Blueprints without having to make those variables “Editable”. This was already possible in the 4.6 release, but not in 4.7. Sorry about that!
AI Blackboard Synchronization
Keys defined in a Blackboard asset can now be marked as ‘synced’, which synchronizes its value across all AI using it. This allows you to synchronize behavior across multiple AIs, or be can be used for communication between them.