Imperfection for Perfection Part 2: Photo Reconstruction/Delighting
Welcome back to the second part of the tutorial ‘Imperfection for Perfection’. In this post, we will take a look at the general workflow of the photo reconstruction process. We will look at using Agisoft PhotoScan, and the delighting process for the texture, with tips for the process that I learned while making the Open World Kite demo.
Preparation
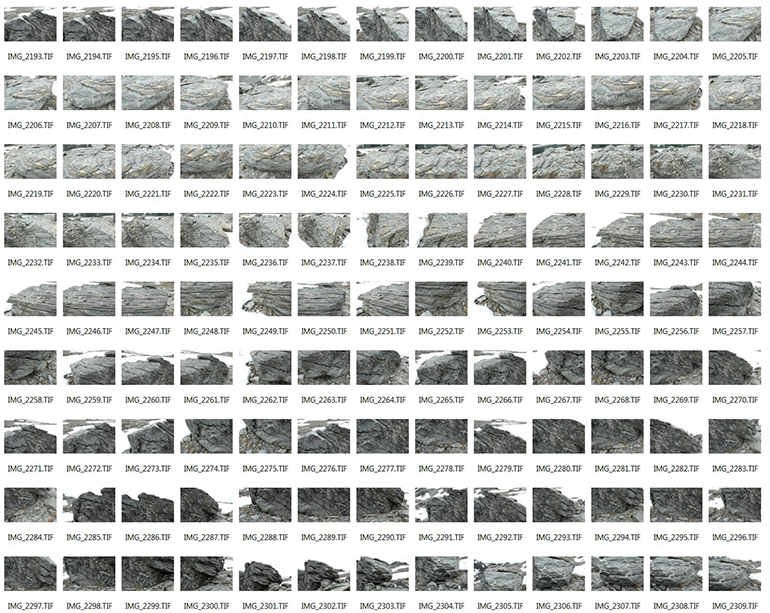
You should filter your photos before starting the Agisoft PhotoScan process to generate the 3D model and texture. There are a few things to consider when you select the photos to process. The photos have to be sharp enough. If the photos are blurry, then you will get a mushy 3D mesh with a blurry texture. Also make sure the pictures are covering all angles of the object but the photos should not overlap too much. More pictures doesn’t mean you will get better results. It’s better to start with as few pictures as possible and add more if some areas have holes. Take a bit of time to go over the pictures one by one, and pick what you need. The time you spend filtering your photos with ends up saving you time in the long run, by making the actual processing of the 3D model faster, and causing it to yield better results.
System and Agisoft PhotoScan preferences
Agisoft PhotoScan is software that is highly dependent on hardware specs includes CPU, GPU and memory. You need a decent machine setup to process quickly. If you have a good enough graphics card (NVIDIA GeForce 8xx series and later), you can set up the OpenCL acceleration with GPU to process the photo reconstruction together, which makes a visible difference in process time.

Also there’s other photogrammetry software available. Feel free to experiment with other programs to see which suits your project best.
https://en.wikipedia.org/wiki/Comparison_of_photogrammetry_software
PhotoScan Reconstruction General Workflow
1. Aligning photos
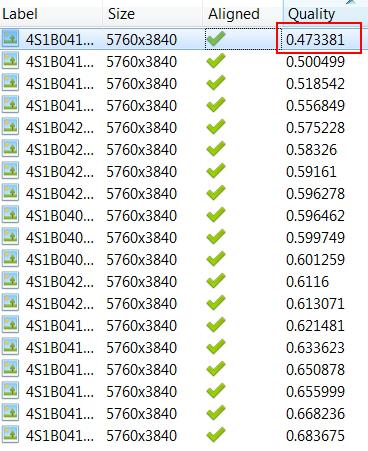
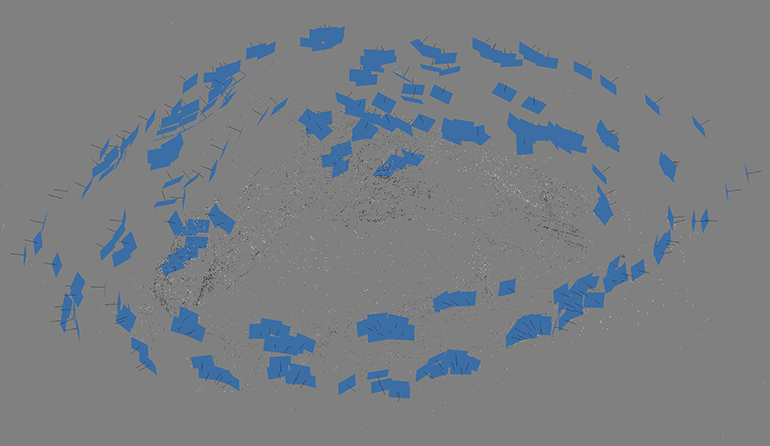
The first step is aligning photos. The ‘align photos’ step is basically trying to figure out the position and orientation of the photos. The ‘align photos’ is relatively fast during the whole process of photo reconstruction. You can run ‘estimate picture quality’ and check the quality value of photos. If the quality is below 0.5, it’s recommended to disable those pictures.
Each blue square represents the position and the orientation of the camera
2. Building dense point cloud

Second, you will run the ‘building dense point cloud’ process, which gives a set of data points in X,Y and Z of 3D coordinates. I’ve found it saves more time and is more efficient to run the ‘lowest’ quality setting of the dense point cloud first. With the lowest setting of dense point cloud, you can start to see what will be processed. From there, you can delete any undesired section of the point cloud. It’s not only saving process time, but also you can make the process concentrate on your desired section for higher poly. After cleaning up the first pass of the dense point cloud, process it again on a higher quality for the desired quality that you want to get. The ‘ultra high’ setting doesn’t alway give you the best result, and it may give you a lot of noise instead of proper details. Also the ‘ultra high’ setting takes much longer to process than the other settings. We mostly used the ‘high’ quality setting for dense cloud stage.
3. Building mesh
Once you are happy with your dense point cloud, you can build the mesh. You can choose two surface types. The closed objects such as rocks and trees should use the ‘arbitrary surface type’. The ‘height field surface type’ is for modeling planar surfaces, such as terrains.

You can adjust poly face counts as you desire. You may have to think about if your computer or software can handle the poly face count you choose. Back in early 2015, when Epic was working on GDC Kite demo, ZBrush only had the 32-bit version, which had a hard time exporting out more than 15 million polys. I’m very glad that we now have a 64-bit version of Zbrush.

4. Building model texture
Building texture has another relatively short process time. You just have to make sure the texture size is big enough to capture all of the details. Rule of thumb: Get the highest texture size possible and resize it later.

Because of the nature of photoscan, UV won’t be very efficient and you should expect to lose a good amount of data later during the clean up process.

5. Saving/Exporting
Finally, your model and texture are ready for export. Make sure to check the file type for the final result you desire. FBX or OBJ work well for model. To be able to delight the texture properly, choose 16-bit Tiff which has more color informations.
Delighting
To take full advantage of UE4’s PBR renderer, light information should be extracted from the processed texture. Otherwise you’ll have baked-in lighting and shadows on your assets, which won’t look correct when you place them in your scene. There’s couple ways to delighting the texture: the first one is using HDR/Grey-Chrome ball information to recreate lighting in a 3D space and the other one simply using Photoshop.
With HDR/Grey-Chrome ball
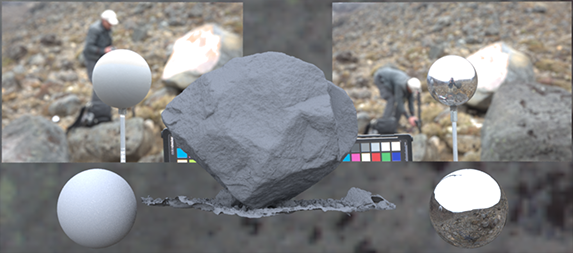
The basic idea of the HDR/Grey-Chrome ball setup is recreating the same lighting scenario in a 3D program. Use a HDR image to light the scene first. Match the lighting intensity by using a grey ball and rotation by using a chrome ball. The target object (in this case it is a rock) has to be life size scale correct for accuracy of the light. You should plan ahead and measure the object, or take photos that you can reference for the size of the object. We used our grey-chrome ball rig for size reference. The target object should have 20% of grey (approximately matching grey ball’s grey value of 18%, also known as middle grey value) to bake out the light information correctly.

Once you recreate the lighting scenario in a 3D program, the next step is to bake out that lighting information from the mesh in the scene. That baked lighting information map will be composited with the original texture to create the delighted texture. Composite operation will be like,
Original Texture / (Baked Lighting information * 5) = Delighted Texture
If you follow these steps, delighting can be done without much manual clean up.

If you don’t have an HDR/Grey-Chrome ball
If you don’t have the proper photo-capture information like the grey-chrome ball and HDR, one of the other methods you can use to delight the texture is by simply using the ‘High pass’ filter in Photoshop.

Simply duplicate the original photo to another layer and apply ‘High pass’ filter with desired radius setting. This filter can make a strong contrasted photo from original texture. After applying High pass filter you can blend back to original photos. Blend modes and opacity can vary for every photo. Experiment with different radius for High pass filter setting and blend modes to get the best result.
NEXT POST
I’m glad to see that many people in our community are interested in the photo reconstruction subject. This tutorial is very much a general workflow of the photo reconstruction process with tips that I found while working on the Kite demo. Hopefully these tips will help you and save you time.
In the next post, we will take a look at how to make a game-ready asset from a high-poly photoscan model with de-lit texture. Stay tuned for the next post!