How to create photogrammetric game-ready assets in UE4
Nature is a beauty that is a harmonized collection of imperfection. To make a photorealistic real-life object in a 3d space can be very tricky. Since it’s a real life object, everyone has seen it, touched it and some have probably even smelled and tasted it. Meaning that if the 3d asset doesn’t have similar enough elements to the real life object, it can be very noticeable. So instead of fighting to get the exact illusion of making the real life object in 3d, you can easily make the 3d asset out of photogrammetric data. Computing power now is strong enough to get 3d scan data within a reasonable time frame and the detail you can get from the 3d scan data is very high so that developers don’t even need a high-end 3d skillset. Also since all the data for 3d is in the scan, the data is highly editable so you can make it into a UE4 game-ready asset easily.
This tutorial will show how to create photogrammetry assets and create game-ready, low poly meshes with maps for UE4 physically-based shading.
The tutorial will be a series of three posts which include:
1. When to use PhotoScan / Photography Equipment and Tips
2. Photo reconstruction / Delighting
3. Game asset ready model / UE4 Setting
I hope it will be helpful to those of you who would like to create photorealistic game assets in UE4!
When to use Photo Scans
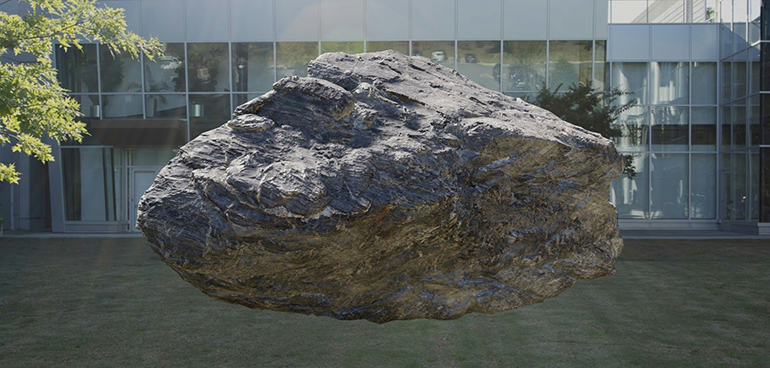
What types of assets would be good to use for a photo scan? You can scan any static object that you can take photos of from multiple angles. As you may have already dug into our Open World Kite demo; rocks, boulders, cliffs, the ground, and tree bark are good objects for a photo scan. Those elements from nature have a lot of beautiful details and unique, organic shapes. Every asset needs a different method to clean it up and make into 3d, but once you learn about the basic workflow, you can apply it to pretty much any static object outside or inside.
These are some examples of the photo scan objects that were used in the open world Kite demo. These assets are available on the Marketplace for free.

Photography Equipment and Tips
Setup/Equipment
Color Checker
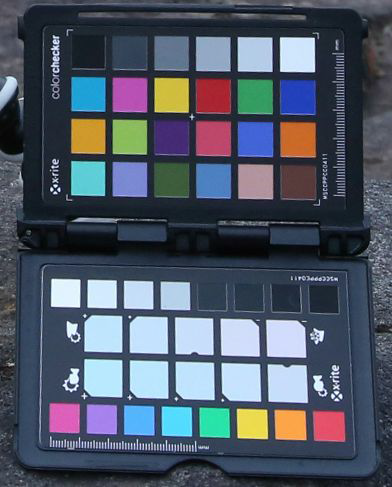
The lighting conditions are a tricky thing to deal with, especially when you have no control of the light outside. This color checker will help you to get the correct consistency/color of an asset. Because different cameras interpret colors in different ways and you need to counteract the color of light in the scene, it is important to use a color checker as a way to calibrate your images. We used X-Rite ColorChecker Passport which comes in a handy compact size to carry around.
Grey/Chrome ball
These balls are used to find the intensity (grey ball) and direction (chrome ball) of the light. These two values will be used to recreate same lighting conditions in 3d space to get the shadow data to delight the original texture. The delighting process will be explained in a later tutorial.

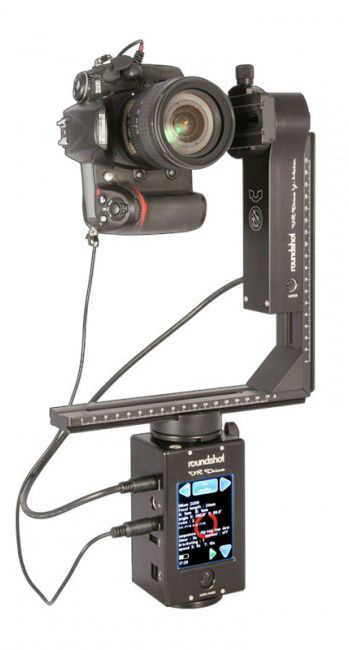
Roundshot VR Drive
Light is not one temperature (color) with one single value of intensity. Depending on the conditions and light sources, there are various temperatures and light bouncing all over the place. To get all of this data, capturing a High Dynamic Range environment shot would be ideal. There are a couple of ways to capture HDR. We used an automated process to capture panoramic High Dynamic Range Images (HDRI). Because cameras can only capture a limited amount of light intensity, we had to take several pictures from the same angles with the camera set to different exposures in order to capture all of the lighting information. These image sets are then merged together to create HDR images. HDR environmental shots will also be used for the delighting process, along with the grey and chrome balls’ lighting intensity and direction data.
Tripod/Monopod
One of the most important aspects of taking pictures for reconstruction is keeping your object entirely in focus. Tripod/Monopod will help to you take steady pictures. Image sharpness is very important, and the camera aperture and depth of field are locked so the pictures will all have the same exposure. This generates the correct textures and makes reconstruction possible.
Full frame camera
We used a Canon 5D MK III with multiple lenses (8mm f/3.5, 24-70mm f/2.8L). Full frame cameras give you great images in lower noise levels at low ISO with dynamic ranges.
Low ISO
If you are shooting in a bright enough environment, set the ISO setting on your camera to its native setting to have the least amount of noise in the images.The range should be within 1,000 to 2,000 lux, which is a typical overcast day and would be ideal. If you can’t get enough brightness, you have to set the ISO higher which will cause noise. Noise in an image will add noise in the reconstruction, which you do not want. It’s better to take a photo on an overcast day than super bright sunny day because the super bright sunny day will cause hard shadows on the object. You want to have the picture with the least amount of shadows as possible, otherwise you’ll have a hard time removing the shadows. Also color can be unmatched in between lit and shaded areas. Therefore, you should check the weather and plan ahead before going out for the photoshoot. The bottom line is a ‘sharp and evenly lit photo’ is what you want to get good results for photo reconstruction.
What I explained above are the equipment and setup that were used to take photos of assets for the Kite demo. We created the demo to show off the power of UE4 and wanted to capture every bit of detail we could possibly get. That doesn’t mean you can’t do a photo scan asset without this gear. You can also do a photo scan with compact cameras or even with your phone, as long as you can take sharp photos in multiple angles.
Taking the Pictures
Take as many pictures as you can to cover the whole area and dimension of the object. The rule of thumb is to always take more pictures then you need to avoid having any blurry pictures from any of the angles. Blurry pictures should be culled out from the reconstruction set and not used. They'll cause reconstruction errors and blurry textures. When you are trying to pursue creating realistic assets, you should try to have the cleanest photos possible from multiple angles.
Conclusion
In this post, we took a look at photo scan reconstruction, equipment, setup and taking pictures. Doing a photo scan is an easy and efficient way to capture real life details. It can be a tricky process at first, but once you get the hang of it, this method will save you a ton of time and give you some of the best results. I hope this tutorial gave you a sense of the best practices for getting images and will help you to create your own PhotoScan 3d assets.
Next post, we will take a look at the workflow of photo reconstruction in Agisoft PhotoScan and delighting for texture. Stay tuned!